

Introduction and Deployment of OpenStack Cloud

I bring high energy and a strong commitment to guiding customers toward achieving their strategic business outcomes. I consistently operate with a big-picture mindset, aligning technology initiatives with long-term enterprise goals. Deeply passionate about innovation, I am a continuous learner who stays ahead of emerging technologies to deliver meaningful, measurable impact.
What is OpenStack?
OpenStack is a cloud operating system that controls large pools of compute, storage, and networking resources throughout a datacenter, all managed through a dashboard that gives administrators control while empowering their users to provision resources through a web interface.
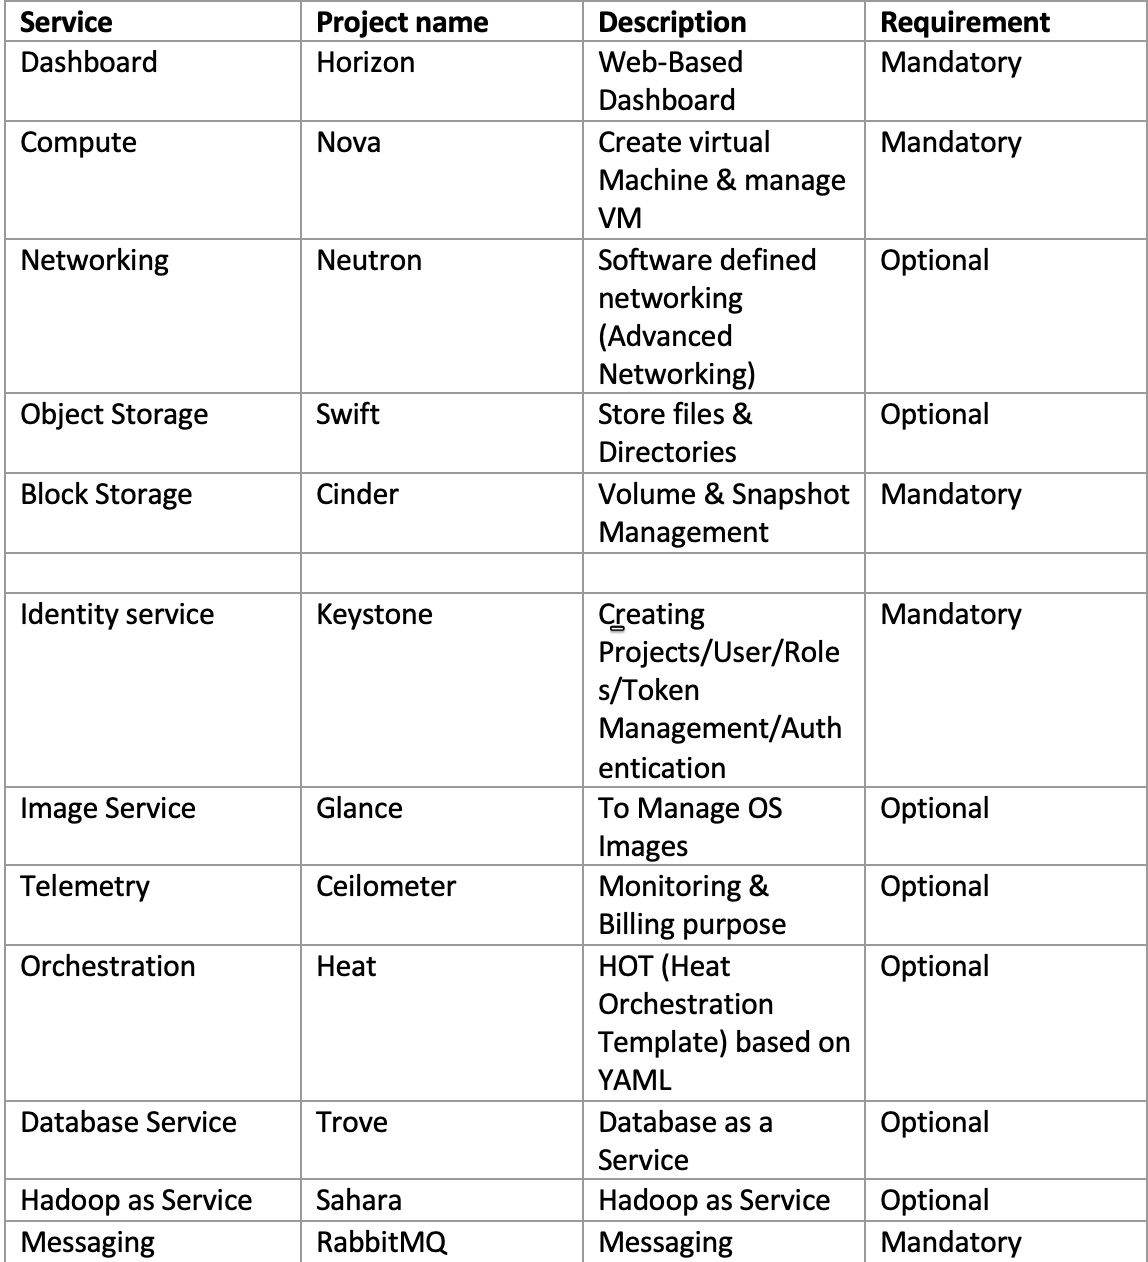
Here is the list of OpenStack Services , project name and description.
Common Components of OpenStack.
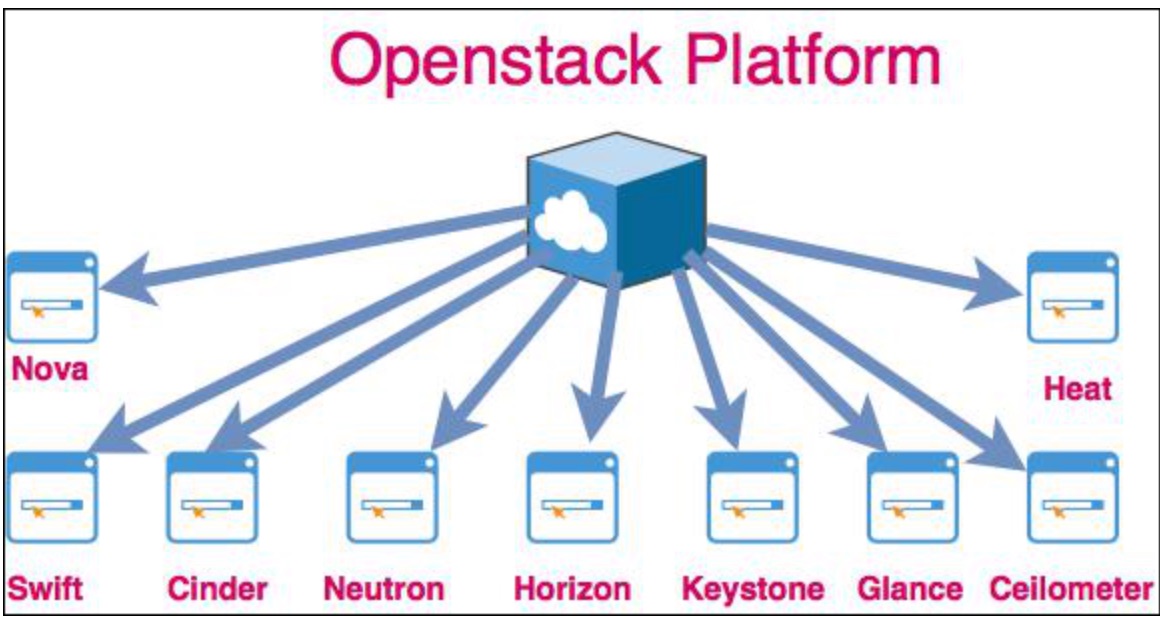 By default, OpenStack has many different moving parts. Besides, because of the open-source nature of the OpenStack, many developers can contribute to the addition of new components for the personalized application. But to clarify, the OpenStack community has declared around 9 components to be an integral part of OpenStack. They are:
- Nova: This is the fundamental computing engine of OpenStack. It manages a large number of Virtual machines and other instances, which handle computing tasks.
- Swift: Swift is the storage system of OpenStack. It is used to store the objects and files. Instead of referring to the file and objects through the path, developers can instead refer to them through a unique identifier, which points to a file or piece of information and thereby allow the OpenStack to manage where to store the files. This reduces the effort of the developers to understand and worry about storage distribution. This also ensures that the data is being backed up, if in case of any failure of the machine or network loss.
- Cinder: Cinder is known as the block storage component of OpenStack. This functions in a way, analogous to the traditional ways of locating and accessing specific locations on a disk or a drive.
- Neutron: As the name suggests, Neutron is the component that enables networking in OpenStack. It ensures that each component within the OpenStack is well connected with other components, to establish good communication amongst them.
- Ceilometer: Ceilometer provides telemetry services to its users. It performs a close regulation of each user’s cloud components’ usage and provides a bill for the services used. Think of Ceilometer as a component to meter the usage and report the same to individual users.
- Heat: Heat is that component of the OpenStack which allows developers to store the requirements of a cloud application in a file so that all the resources necessary for a program are available at hand. It thus provides an infrastructure to manage a cloud application. It is an orchestration instrument of OpenStack.
- Horizon: Horizon is the dashboard of the OpenStack system. It provides all the possibilities for the system administrators to access and manage the cloud. This is the first component that everyone “sees” upon starting to use the OpenStack. Developers will be able to access and deal with all the components through the Application Programming Interface (API) also, while Horizon is the only place through which the system admins will be interacting with the OpenStack architecture.
- Keystone: Keystone is the component that provides the identity services for all the users. It basically contains a central list of all the users of the OpenStack cloud, mapped to the accessible services of the OpenStack. It provides a way for multiple accesses by allowing the developers to map their existing user access methods to the Keystone.
- Glance: Glance provides the image services in OpenStack, where images refer to the virtual copies of the hard disks. Glance helps in allocating these images to be used as templates while assigning new virtual machine instances.
Why OpenStack and how does it fit our requirements?
Here are a few reasons:
- OpenStack is most importantly an open source environment that gives complete control over the cloud computation. Most of the platforms available in the market, which helps in virtualization and cloud computation, are all expensive and licensed.
- OpenStack can be installed free of cost and can be customized with the required services to suit the need. Hence many corporations own their own version of OpenStack.
- Moreover, it can be scaled to any extent possible, making the jobs of the server admins easier.
- The OpenStack API is made robust and more flexible with improvements contributed by many developers across the world. This also ensures good community support.
- Many enterprise customers in the IT world have adopted OpenStack on their cloud management.
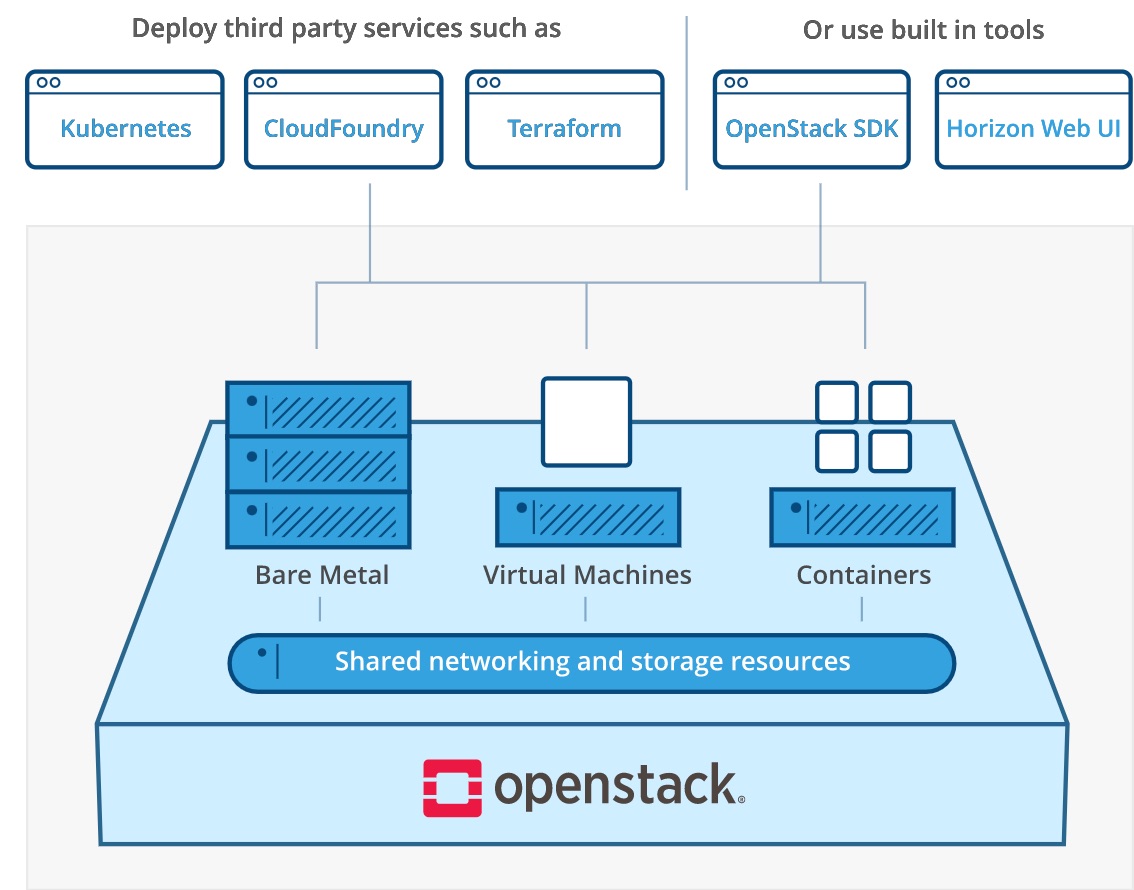
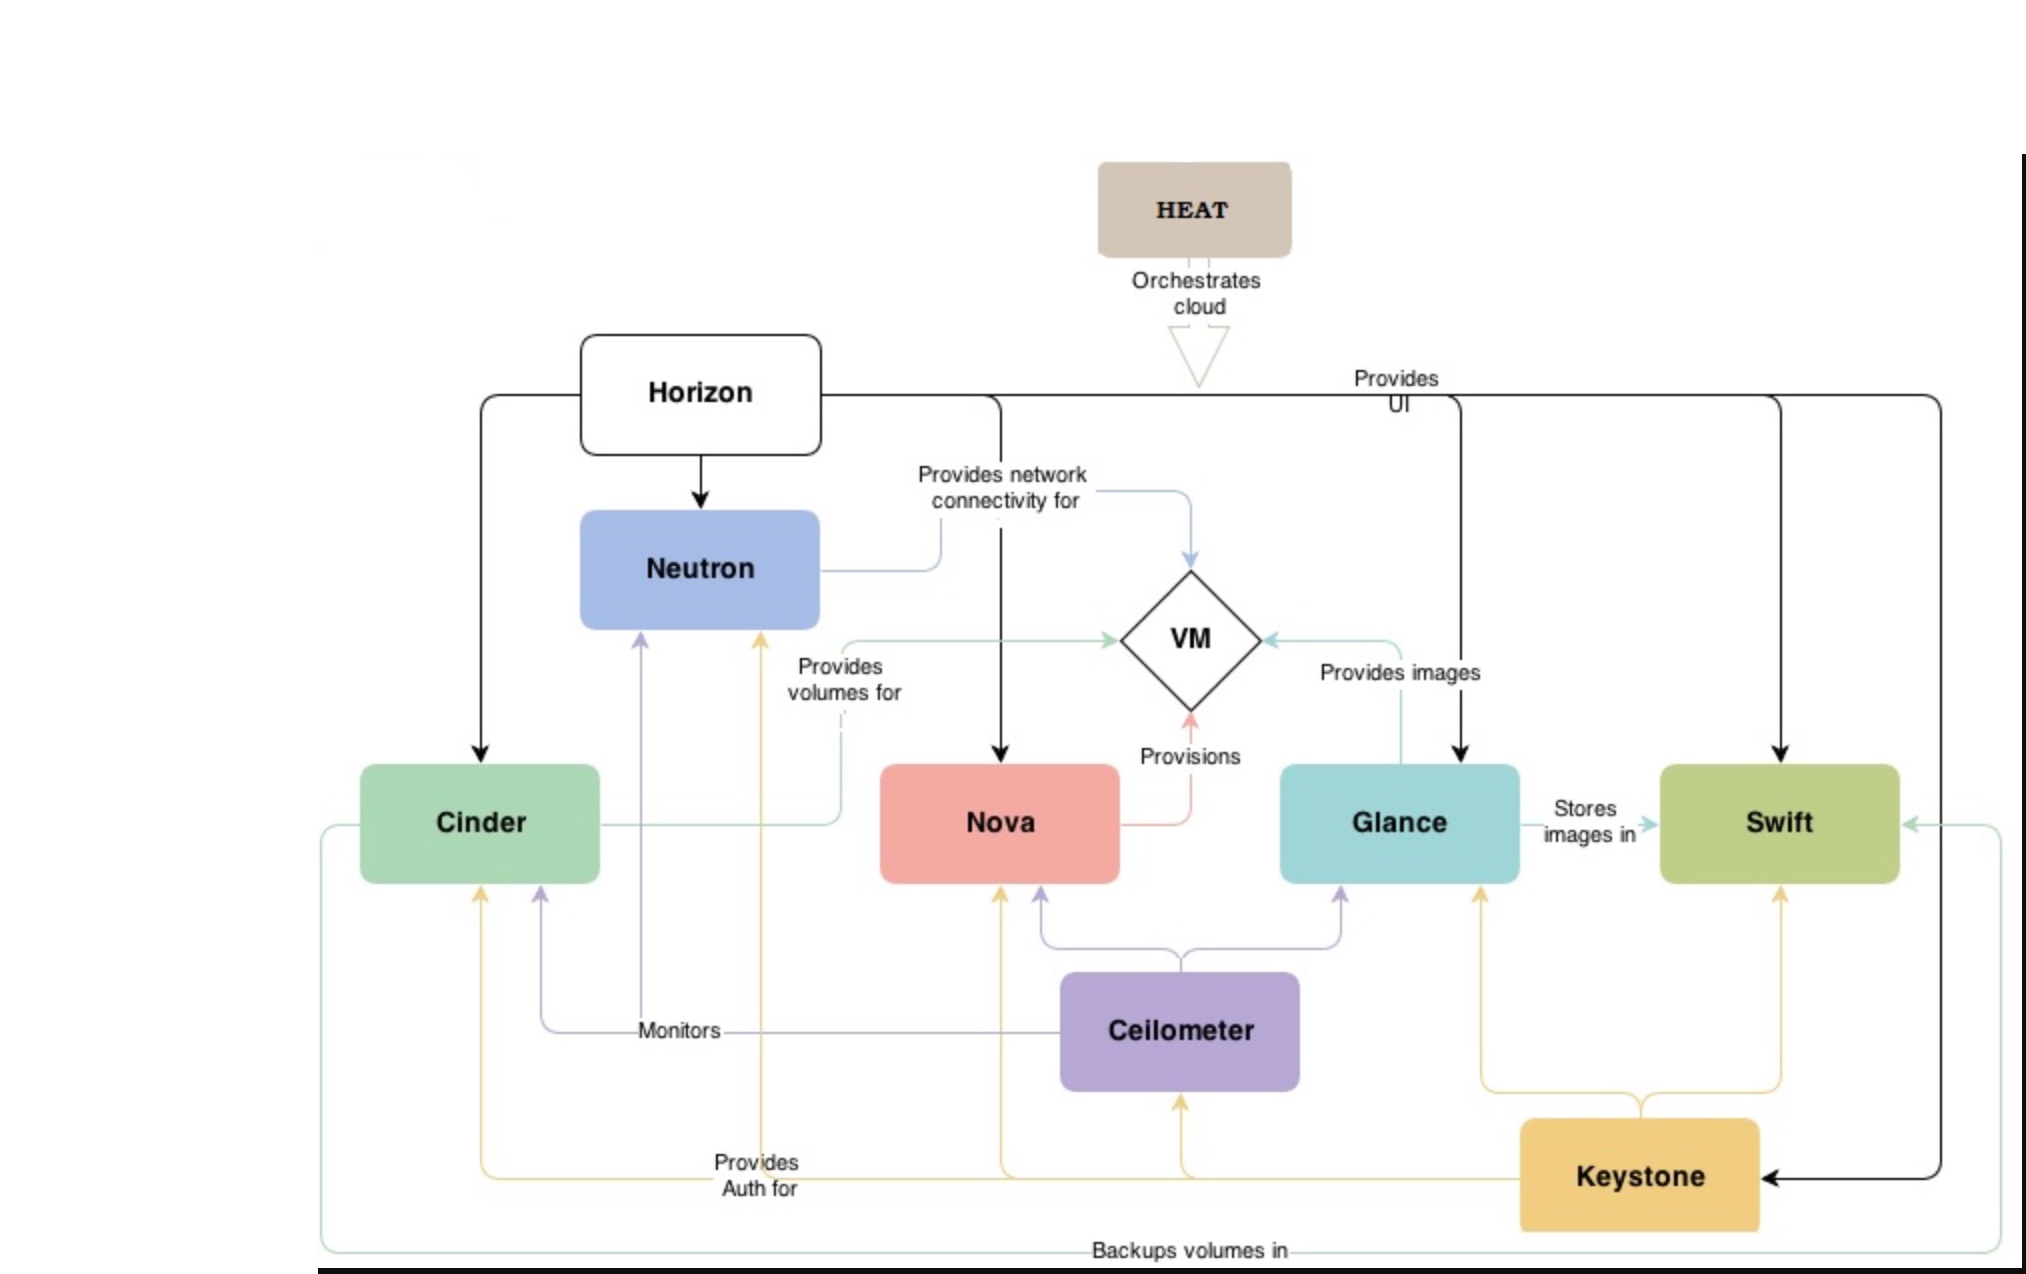
OpenStack Architecture:
The below diagram shows how the openstack components are interconnected.
How Openstack works ?
OpenStack can’t be directly installed on hardware. It requires operating systems which supports virtualization in the back-end. At present , Ubuntu(kvm), Redhat enterprise Linux(kvm) , oracle Linux(xen) , Oracle Solaris(zones), Microfsoft Hyper-v, VMware ESXi supports openstack cloud platform. That’s why openstack is the strategic choice of many types of organizations from service providers looking to offer cloud computing services on standard hardware, to companies looking to deploy private cloud, to large enterprises deploying a global cloud solution across multiple continents. Rackspace and HP are offering public cloud via openstack cloud platform.
OpenStack vs. AWS
A comparison table for OpenStack vs AWS based on the services offered by both the software is given below. Take a quick look at these services and see if any of the features appeal to you.

Installation of OpenStack on Ubuntu server
Requirements: You will need a multi-core processor and at least 8 GiB of memory and 100 GiB of disk space. MicroStack has been tested on x86-based physical and virtual machines running Ubuntu 20.04 LTS on latest version. In my home lab i used the same configuration. I created a virtual machine in my home server and installed the latest Ubuntu.
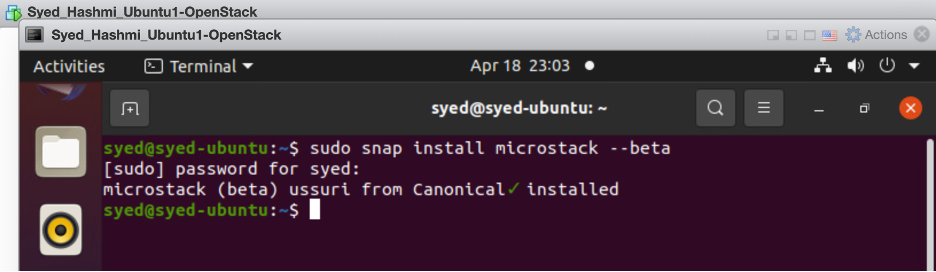
- First, execute the following command to install the MicroStack snap:
sudo snap install microstack --beta
- When the installation process has finished, then view information on the installed snap by entering the command.
snap list microstack

- Then initialize MicroStack. According to the documentation, this will "automatically deploy, configures, and starts OpenStack services. In particular, it will create the database, networks, an image, several flavors, and ICMP/SSH security groups." The command I used is: sudo microstack init --auto --control
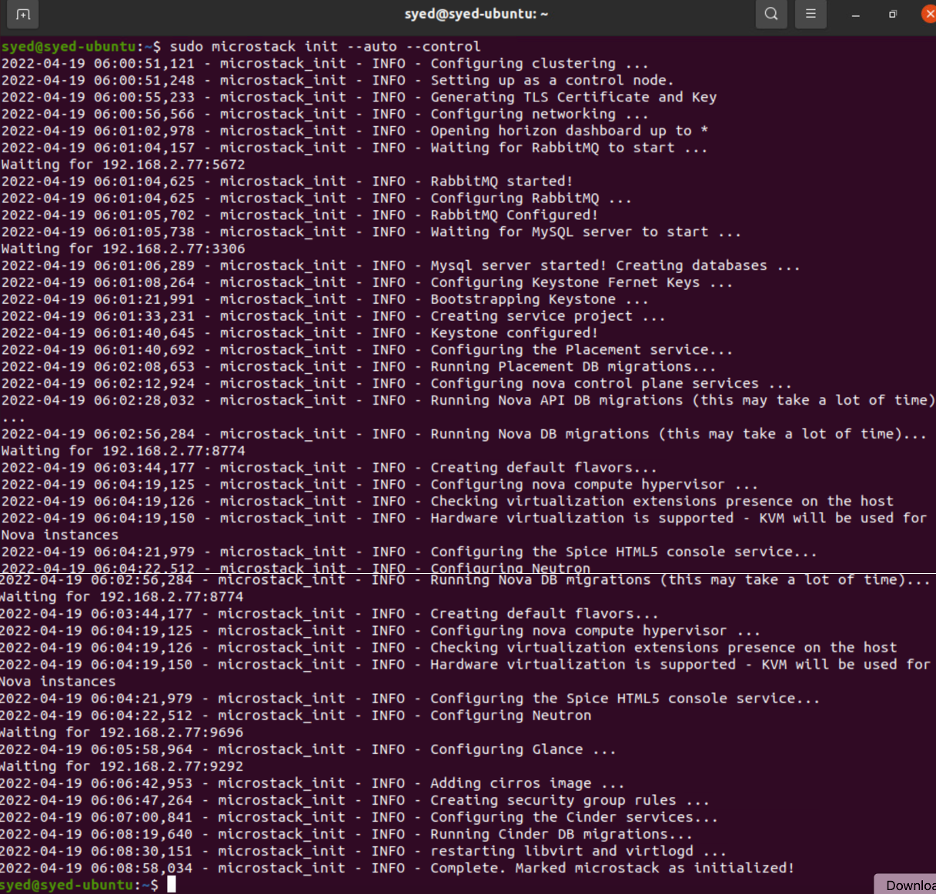 This can all be done within 10 to 20 minutes depending on your machine.
Verification:
- Once the initialization is finished, you can run a few commands to check functionality. The standard OpenStack client comes pre-installed:
microstack.openstack <command>
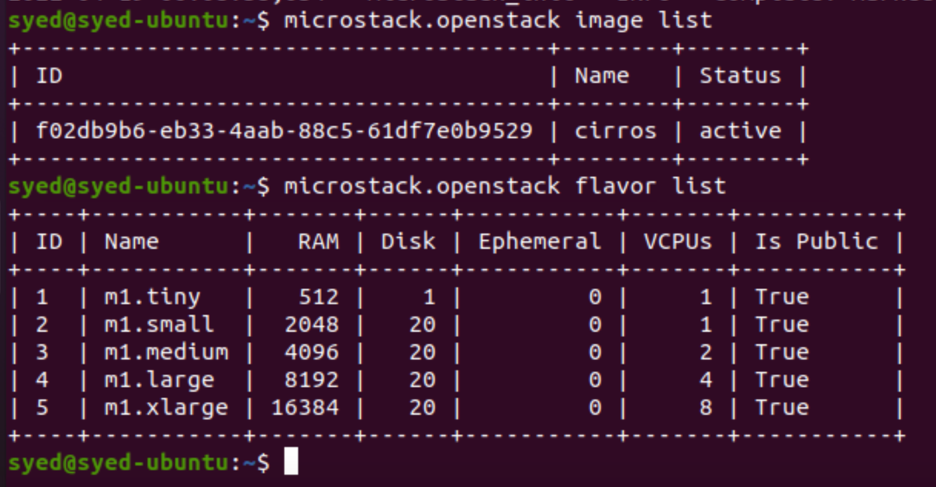
To list the default image, run:
microstack.openstack image list
To get the default list of flavors:
microstack.openstack flavor list
Create an instance:
MicroStack comes with a convenient instance creation command called microstack launch. It uses the following defaults for its instances:
keypair ‘microstack’ flavor ‘m1.tiny’ floating IP address on subnet ‘10.20.20.0/24’ To create an instance named ‘test’ based on the ‘cirros’ image:
microstack launch cirros -n test

Connect to the instance Output from the microstack launch command includes all the information needed to connect to the instance over SSH:
Creating local "microstack" ssh key at /home/ubuntu/snap/microstack/common/.ssh/id_microstack Launching server ... Allocating floating ip ... Server test launched! (status is BUILD)
Access it with ssh -i /home/ubuntu/snap/microstack/common/.ssh/id_microstack cirros@10.20.20.128
Access the instance using the private SSH key associated with the default keypair:
ssh -i /home/ubuntu/snap/microstack/common/.ssh/id_microstack cirros@10.20.20.128
Access the cloud dashboard
You can log in to the web UI by pointing your browser to the following URL:
https://10.20.20.1
The username is ‘admin’ and the password is obtained in this way:
sudo snap get microstack config.credentials.keystone-password
 Access the Cloud Dashboard
To access the OpenStack Cloud Dashboard, you need to open a browser with the IP address of the virtual machine running MicroStack.
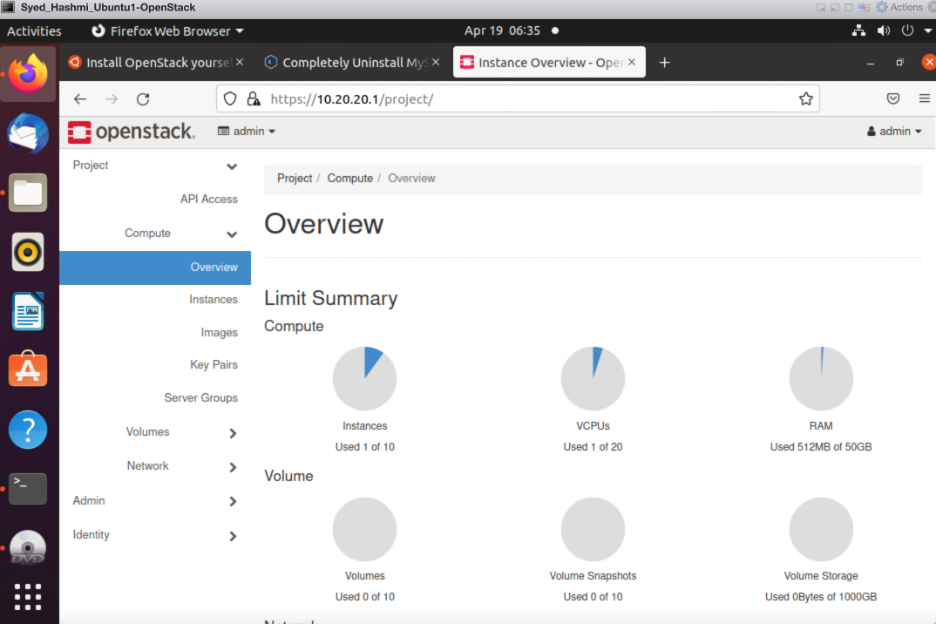
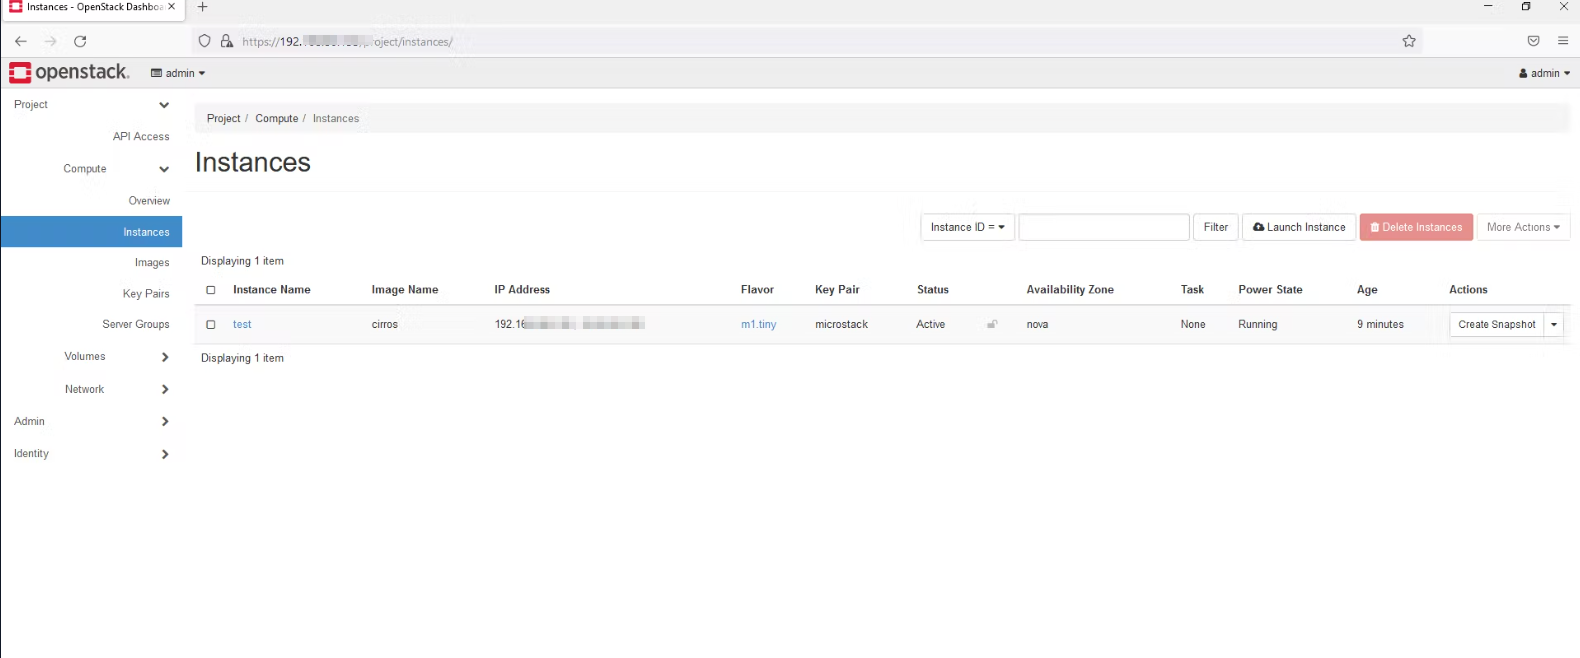
Upon logging in you should see the created instance:
Conclusion: In this blog I share what is OpenStack and its components and how OpenStack works, also how you can quickly install the OpenStack on Ubuntu server.


